Posts Tagged ‘Adobe Photoshop

22
Sep
10

Advanced Sharpening Technique – Easy Steps:

Advantage : affects only the detail of the image and not the colour (since it is held in the a and b channel), hence less noise.

1) Open your image in Photoshop.

2) Go to Image>Mode and select ‘LAB Color’. (In default, you should be editing your image in RGB mode.)

3) Now that you’re editing your image in LAB colour mode, go to Window>Channels to open your channels window.

4) Now that your channels window has popped up, you should see 4 different channels: Lab, Lightness, a & b. Select the ‘Lightness’ channel.

5) Go to Filter>Sharpen>Unsharp Mask. Use an Amount of 300%, Radius 0.8 and Threshold 1. Your image should look very much oversharpened at this point, but fear not.

(Try setting the radius at the resolution of your image divided by 200, if the resolution is 600 dpi then the radius  should be set at 3, 600/200)

6) Go to Edit>Fade Unsharp Mask and keep the mode at ‘normal’. Adjust the opacity with the preview box ticked (around 60-70% should give you adequate sharpening). Choose your favourite level of sharpening and click ‘OK’.

7) Now go to Image>Mode on your toolbar and switch back to ‘RGB Color’.

Doesn’t this feel great?

31
Jul
09

why is everyone crazy abt ‘cross processing’……

I don hav the answer but I was too attracted to the visible impact of a photo that has undergone digital cross processing. The effect was discovered accidentally on the good old film photos after someone somewhere had used the wrong chemical to develop the films. The only way to describe is the effect gives a photo the ageing element, like one of those photos my grandpa had dug out to show me.

IMG_0845a IMG_0845

IMG_1161 IMG_1161b

Anyway, enuf of my interpretation, here is how.

1) duplicate yr photo

2) bring up a curve layer and tweak the individual RGB profile like shown in the picture below (consider saving these settings like I did)

Picture 1

3) create a blank layer and fill it with yellow colour ( any yellow shade will do, u do not hav to be tht precise. This step is optional).

4) change the blending mode to ‘color’

5) readjust the opacity to your liking (@8-15%)

tht is it……

01
May
09

I give you digital infrared conversion

Sunday evening, Windy.

Digital Infrared

I am sure you, like me,  find that the nitty gritty details of the whole infrared film developing process all too boring. It is akin to owning a car, I know how to drive it but I am not interested in knowing how many pistons it has or gasket wears it suffers in a year. Now with photoshop, you could either go out and buy an IR filter for your camera from a reputable manufacturer OR you could attempt to reproduce an IR photo on your computer monitor. The choice is yours.

An outdoor landscape photo with lots of foliage and green works best as the colour green is best at reflecting most of the background IR light. 

Original

Infrared conversion


Infrared conversion


How

1. Always duplicate your photo

2. Convert your photo to 16 bits/ channel by going to Image>Mode>16 bits/ channel.

3. Add a Levels adjustment layer, click ‘Options‘ in the Levels dialogue and check ‘Enhanced Per Channel Contrast button’ and ‘Snap Natural Midtones’, reset both the Shadows and Highlights Clipping % to 0.

Adjustment layers

Adjustment layers

4. To highlight the green in leaves. Add a Channel Mixer adjustment layer, set it to ‘Monochrome’. Increase the Green channel (for foliage) to max ie 200%. Reduce the other 2 channels percentages appropriately. For this particularly photo I reduced Red channel to minus 66% and the blue channel to minus 34% (100% total). You can always come back to this step to tweak the settings.


picture-1

5. To add glow to the leaves. Select the Background copy layer active, go to the Channels palette and highlight the Green channel. Apply a 5 px Gaussian blur (more on bigger image to achieve a more diffuse effect) and go to Edit>Fade Gaussian Blur and reduce the Fade opacity to 30%. Change the blend mode to ‘Screen’.


Channels

Channels


4


picture-2


6. To reduce burnt out highlights. Select and reactivate the Levels adjustment layer, refer to the Histogram palette (not the one in the Levels dialogue) and move the sliders appropriately.

7

Histogram


7. To further stimulate the infrared emulsion, try adding some Gaussian noise to the Background copy layer

8. Change photo back to 8 bits/channel to have more ‘save as’ options. Enjoy.


17
Apr
09

I give you Gif animations in CS3

I have always wonder how to make a simple gif animation using simple jpeg files. 

Here’s how.

sample

    Choose 2 or more sample pictures, I have here a woman that was transformed instantly with SK-III, a pre and post photos.


step 1 Go to the top menu, File>Scripts>Load Files from Stack.


Step 2 Once the files are loaded, go to Window>Animation


Step 3  Before you do anything else, it is important that you set some parameters for your animation. Click on the option button at the upper top right corner of the animation window (see below). For this exercise, I have set the total duration to 2 seconds and frame rate at 1 fps.

                               step 4


   picture-51To begin stitching the frames together, you must first highlight all the photos in the palette well by Shift + click


step 6 


 Then click on the option button on the animation window and select Make Frames From Layers

step 8    


We are almost there, once an animation is created, you can use the playback button to check the transition and frame rates.

Once you are happy with the result, go to Save for Web and from there, you can choose the resolution that suits your requirement.

End result

old

01
Apr
09

I give you 50 % Grey point on your colour photo, this ain’t April’s fool joke.

So, today’s April’s fool day and this is not an April’s fool trick.  Read on what I have here for you keen photographers out there.

How do you locate the 50% Grey point on your photo?

Some use the good old ‘eye-balling’ method, but hang on, sometime it is not easy to locate a single true grey point on a photo. I thought surely Photoshop must have a way to crack this and take out a lot of the guess work for the users. After some soul searching sessions, I have come out with a way that has worked for me.

1. Duplicate your photo and fill it with 50% Grey by going to Edit>Fill>50% Grey.

picture-22

Fill Layer with 50% Grey

2. Set the Blending mode of that layer to ‘Difference’

3. Create a Threshold adjustment layer. Move the slider all the way to the left (Red arrow). You will be looking at a white screen, now slowly move the slider to the left, until you see some black patches start to appear on the photo (Blue arrow). Stop. Click OK.

picture-6

Threahold Adjustment Layer

4. Pick the Colour sample tool from the eye dropper tool menu and click on the black patch to sample the area (or just click shift if the eyedropper tool is already selected).

picture-3

Colour Sampling

5. Turn off both the Threshold adjustment and the Grey layers. You will now see exactly where the 50% Grey point is located on your photo.

pin point location

pin point location

Tips

You can use this method to find your colour of choice on a photo.

Similarly, for Highlight and Shadow, you do not need to create a new Fill layer. Just apply Threshold to your photo and move the slider slowly from far left to right For the Black, and from far left to the right for White. OR an easier way >create an curve or levels adjustment layer, press and hold the ‘alt’ key (Mac) and move the highlight or shadow sliders to identify your highlight and shadow points respectively.

Use this method for yet another method of White Balance.

08
Mar
09

I give you an alternative digital Saturation.

Original

Original - dull

When it comes to adding saturation to a dull and washed out photo, it is the personal taste that dictates how much should be added to give a photo more punch. Most do it by going to Image>Adjustment>Hue/Saturation. This together with a good level of contrast are often sufficient to transform a photo completely. At times, you may feel that a particular photo deserves more boost/saturation, but you soon discover that by pushing the saturation level too high, colours start to ‘block out’ causing a loss of details and photo appears unnatural.   

With a little PS skills, You may then prefer to opt for a non-destructive route by adding a hue/saturation adjustment layer and selectively erase away the overdone areas but this again may look unnatural. Here is a smarter method that will retain more detail in your photo and allow flexibility to ‘max’ out the saturation.


endnote

you will find like I say, not every photo need such drastic steps to boost colours. I find this suits most shots that contain lots of texture. Sometime, subtle details can have a big impact.


Sat. blow out

Colour blow out - Sat +50


digsaturation

Retain detail - Sat +50


1) Duplicate your photo

2) Apply Gaussian blur and use a radius between 3 and 5px (do experiment with pixel radius as the effect will largely depend on the original size, but I find generally 3-5 px is sufficient)

Apply Gaussian Blur

Apply Gaussian Blur


3) Click in Layer palette where it says Normal and change the blending mode to Colour.

Blending mode

Blending mode


4) Click on the Adjustment Layer icon and select Hue/Saturation. Move the saturation slider to about 45-55%, then click OK.

5) Press and hold Alt on the keyboard and in the Layers palette, click on the line between the Adjustment layer and the Background copy to clip them together.

(Alternately, you can press Alt and select Hue/Saturation at the same time. Check ‘Used previous layer to create clipping mask’, then move the slider as mentioned)


Layer Clipping

Layer Clipping


6) That’s all and enjoy.

18
Feb
09

I give you perfect White Balance everytime

So, here we are…. February year 2009. Many things have happened since New Year, such as the world is now creeping slowly into recession, unemployment numbers are getting worse, the USA has elected a new President (I have high hopes for this guy but he needs time and 4 years is not gonna be enough) and my baby daughter had grown 2 more milk teeth. Anyway, the year of Ox will hopefully bring better luck to all.

Back to the subject…….

Digital Cameras are getting better and better, but they still cannot compete with human eyes. This is especially true in situations where the lights are tricky to read. For those who are lucky enough to have the opportunity to play with the Adobe Photoshop but too poor to afford a white balance Grey card (How many do you see use one!!), I will show you a neat little trick to get the white balance spot on, time after time!

Here is a photo that was taken under halogen lighting, which throws a nasty orange cast to the subject. There are many ways to correct this but they are no where near as simple and as consistent than what I am about to show you, we will try to correct this in less than 1 minutes and that I promise you.

1) Duplicate the photo in your method of choice (and I don’t mean by drawing)


2) Go to the top menu> Filter>Blur>Average, this Average filter is by no mean ‘average’, it determines the average colour of the picture, based on the colour value of each pixel in the image and fills the image window with that colour. By now, the photo will transform into one single colour, in this case, the brown colour. Do not panic!


(In knowing the overall colour, it’s also a good way to determine a suitable border or frame colour.)


3) Now create a ‘curve’ adjustment layer by clicking on the adjustment icon on the layers palette.
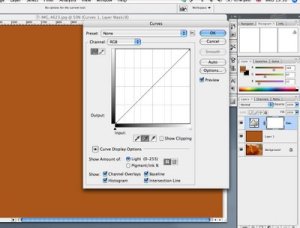
4) Select the handpicker in the middle to set the grey point, then click anywhere on the middle layer. This will transform the brown colour into 50% Grey.
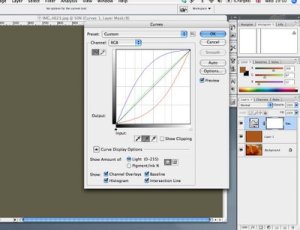

5) Now, turn off the middle layer and the original background photo will now have the correct white balance.
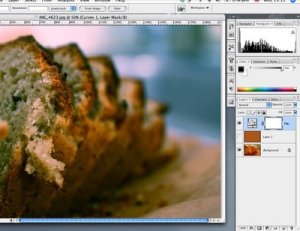

It really is ‘a piece of cake’, agree?

Tips

No PS tricks are set in stone, your imagination is the limit.
Once you have created the corrected curve adjustment layer, just drag and drop onto other photos that were taken under the same lighting.
You could create an action for this, but this is already so simple…
For those who prefer shooting jpeg, you can still use Adobe Camera Raw to open your photo and correct WB if you wish, just change the settings in the PS.

Caution

This method will not work if you are trying to capture the lighting condition associates with sunrise/sunset.


May 2024
M T W T F S S
 12345
6789101112
13141516171819
20212223242526
2728293031